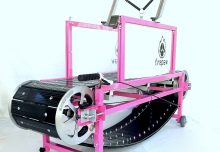
Mobile dog gyms are one of the fastest-growing trends in canine fitness. They offer flexibility, convenience, and a premium service experience. But there’s one challenge every operator quickly faces:
👉 Noise and vibration inside the van
Without proper treatment, a van can easily turn into a “resonance box” — amplifying the sound of the treadmill and creating discomfort for both the dog and the trainer.
The good news? With the right approach, you can dramatically improve the environment using simple, accessible solutions.
🔊 Understanding the Real Problem: It’s Not Just Noise
Before jumping into materials, it’s important to understand this:
👉 Most of the “noise” in a mobile dog gym comes from vibrations, not airborne sound.
When a treadmill operates:
- Vibrations travel into the van floor
- Then spread through the metal structure
- And finally turn into audible noise
That’s why basic “soundproofing” alone is not enough.
You need a combination of vibration control + acoustic treatment.
🔇 Step 1: Build a Proper Floor (The Most Important Part)


The floor is where everything starts. If you get this right, you’ll solve 70% of the problem.
Recommended setup:
- Base layer: Thick rubber (10–20 mm)
- Middle layer (optional): Plywood for stability
- Top layer: Rubber flooring (8–15 mm, anti-slip)
Why it works:
- Absorbs vibrations before they enter the van structure
- Provides a safe, non-slip surface for dogs
- Easy to clean and highly durable
👉 For a basic setup, even a single layer of heavy-duty rubber flooring (gym or stable type) is a great start.
🧱 Step 2: Treat the Walls (Stop the “Echo Effect”)


Bare metal walls reflect sound and amplify noise.
Simple and effective solution:
- Plywood panels (6–10 mm)
- Optional: thin foam layer behind them
- Finish with a coating or PVC for easy cleaning
Result:
- Reduced echo and resonance
- More comfortable environment
- Better hygiene and durability
🔊 Step 3: Don’t Ignore the Ceiling


The ceiling plays a bigger role than most people think.
Basic solution:
- Closed-cell foam (5–10 mm)
- Covered with a light panel
Benefits:
- Reduces “box effect”
- Improves overall acoustic comfort
⚙️ Step 4: Isolate the Equipment
Even with a well-built interior, one mistake can ruin everything:
❌ Mounting the treadmill directly to the metal floor
This transfers vibration into the entire van.
Better approach:
- Use rubber pads or anti-vibration mounts under the treadmill
- If fixation is required → mount through rubber (not directly)
👉 This keeps the equipment stable while minimizing noise transfer.
⚠️ Common Mistakes to Avoid
- Using soft, porous materials that absorb moisture and odor
- Overcomplicating the system with materials not suited for mobile use
- Ignoring vibration and focusing only on “soundproofing”
- Choosing surfaces that are hard to clean
🧼 Hygiene Matters Just as Much as Acoustics
In a mobile dog gym, everything must be:
- Water-resistant
- Easy to clean
- Durable under repeated use
That’s why materials like rubber, coated plywood, and closed-cell foam are preferred.
💡 Standard vs Professional Solutions
There are two main approaches:
✔️ Standard (DIY / Budget-Friendly)
- Rubber flooring
- Plywood walls
- Basic foam insulation
👉 Easy to source locally, great for starting out
🔥 Professional (Advanced)
- Multi-layer anti-vibration systems
- Acoustic insulation materials
- Custom mounting solutions
👉 Best for high-end mobile gyms and intensive use
🧠 Final Thought
👉 You’re not just reducing noise — you’re creating a controlled training environment.
A quieter van means:
- Less stress for the dog
- Better focus during workouts
- A more professional experience for your clients